So you were out drinking last night and got an awesome video of your best friend making a fool of himself, what better way to share it with the world than by using Microsoft’s latest technologies Silverlight and the Expression Suite.
Microsoft are currently offering Silverlight streaming facilities for everyone with a .NET passport, this means anyone with a hotmail or msn account. Silverlight streaming gives users up to 4GB of storage space where Silverlight media and applications can be uploaded. All of which is absolutely free! So what do we need to take full advantage of this:
Microsoft are currently offering Silverlight streaming facilities for everyone with a .NET passport, this means anyone with a hotmail or msn account. Silverlight streaming gives users up to 4GB of storage space where Silverlight media and applications can be uploaded. All of which is absolutely free! So what do we need to take full advantage of this:
Crazy Video Footage (not supplied by Microsoft :p )
Expression Media Encoder
Silverlight Streaming Account (.NET Passport)
Preparing Video Footage
Expression Media Encoder
Silverlight Streaming Account (.NET Passport)
Preparing Video Footage
Once you have you footage uploaded from your camera or phone and its stored on your PC its time to convert this into a smaller file that can be easily streamed from the web. An ideal tool to do this is Microsoft Expression Media Encoder which can be downloaded and installed in a matter of minutes.

Expression Media Encoder allows you to optimise and imported video depending on how it will be utilised, you can choose from a number of different video settings such as Streaming Broadband, Web Server Broadband, Streaming 512K DSL this will then decide how best to encode the video so that is optimized for the chosen usage. You can also choose the audio settings, so for example if you were uploading a music video you could encode the audio in a higher quality.
 Now that you have selected your encoding type you can compare this to the original footage that you recorded by using Media Encoders great “A/B Compare Mode” this splits the video so that half of the clip is in the original video format and the other half is in the proposed encoding format. The compare mode can be done in a number of ways, splitting the video vertically, horizontally or just creating two instance of the video one in the old and one in the new format.
 Finally you need to select the output template for the video this is how the video controls will look, there are a large selection of different templates that you can use. However if you are feeling particularly creative you can create your own template in Expression Blend, using all the great features of Blend to create a rich interactive media player.
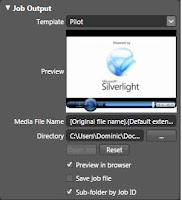
After pressing Encode the video will be encoded to the correct format and placed on your PC, all that needs to be done now is preparing it to be uploaded to Silverlight Streaming.
Getting Ready to Upload
When you have located the folder containing all the items created by Expression Media Encoder you will be presented with a large number of files, not all of are needed. We only need the following:
MicrosoftAjax.js
BasePlayer.js
PlayerStrings.js
player.js
StartPlayer.js
Player.xaml
Alongside these files we also need to create a Manifest XML file with the following code:
<SilverlightApp>
<version>1.0</version>
<loadFunction>StartWithParent</loadFunction>
<jsOrder>
<js>MicrosoftAjax.js</js>
<js>BasePlayer.js</js>
<js>PlayerStrings.js</js>
<js>player.js</js>
<js>StartPlayer.js</js>
</jsOrder>
</SilverlightApp>
We now have a folder containing all the needed files so that the video can be uploaded to the web, we need to zip these files into a single .zip file.
Upload Your Video
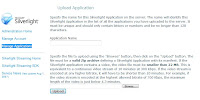
We now need to head across to https://silverlight.live.com/ and using your .NET Passport register with the site to receive your 4GB storage space, once registered head to Manage Applications, and then select Upload Silverlight Application.
Here you will give your video a name and then browse your PC to find the zip file you created previously containing the video and manifest.
We now have our video hosted on the Silverlight Streaming site and can use the given three code snippets needed to embed the video into a website of our own.
Here you will give your video a name and then browse your PC to find the zip file you created previously containing the video and manifest.
We now have our video hosted on the Silverlight Streaming site and can use the given three code snippets needed to embed the video into a website of our own.
What You Waiting For?
Now that you have seen how easy it is to go out and get your free web space and upload some videos.
Dominic Green (MSP)

No comments:
Post a Comment